Showing posts with label Valentine's Day. Show all posts

Saturday, February 13, 2016

Valentine's Day Dollie Ideas

Since Valentine's Day is tomorrow, I thought that I'd show you all a bunch of Valentine's Day items from different stores that would be perfect for your dolls. Hopefully, these will give you all fun ideas for tomorrow!

Stage One: The Perfect Outfit

Hearts on White, Valentine's Day Sleeveless Dress for Your American Girl Doll
Image from "Dresses for Dolls" Etsy Shop


Hearts on White Valentine's Day Sleeveless Dress
Made By: The Etsy Shop "Dresses for Dolls"
Cost of Item: $5


Red Glitter Mary Jane Sparkle Shoes - Fits American Girl Dolls - Doll Shoes Valentine's Day
Image From "Doll Connections" Etsy Shop


Red Glitter Mary Jane Sparkle Shoes
Made By: The Etsy Shop "Doll Connections"
Cost of Item: $3.95


Stage Two: The Perfect Hair

Image from Agoverseasfan

AG Valentine's Day Hairstyles Video
Made By: Agoverseasfan Youtube Channel


Stage Three: The Perfect Accessories
American Girl Friends are Sweet Set - MY AG 2014
                 Image From American Girl

Friends Are Sweet Set
Made By: American Girl
Cost: $8


18 Inch Warm Your Heart Doll Food Set Perfect for the American Baking Girl! Includes Hot Cocoa, Cake Pops, Cookies & More! Mini Doll Food by Sophia's
           Image From Sophia's 

Warm Your Heart Doll Food Set
Made By: Sophia's 
Cost: $12.95


Saturday, February 14, 2015

Valentine's Day Outfits

 Happy Valentine's Day everyone! 
Today I am going to share with you some pictures of what my dolls are wearing for Valentine's Day.

Kanani (I am still debating over whether or not to rename her)


Outfit Includes...
Dress: I received this pink dress for Christmas a few years ago.
Shoes: These shoes came with Rebecca's Lace Dress.


Hairstyle Includes...
Hairstyle: A big bun on the middle of Kanani's head.
Accessory: A pink bow from the American Girl Store Bistro.

Elizabeth


Outfit Includes...
Dress: Elizabeth's Meet Outfit (the outfit she came in when bought)
Shoes: Elizabeth's Meet Shoes (came with her Meet Outfit)


Hairstyle Includes...
Hairstyle: A ponytail.
Accessory: None.

Felicity


Outfit Includes...
Dress: Felicity's Gala Gown
Shoes: Felicity's Meet Shoes (came with Meet Outfit)


Felicity's Hairstyle Includes...
Hairstyle: Hair down
Accessory: Lace Mob Cap from Felicity's Gala Gown set

Felicity & Elizabeth


This is a "just because" type picture. I had to take one of only Felicity & Elizabeth
because they are BFFs in the books! (sorry Kanani)

Group Shot


The Three Musketeers or Three Amigos (why is three always in these nicknames?)
are ready for Valentine's Day Action, or to sum it up, ready to eat some candy!

From the S'more AG Family...


Love Ness Two Medium


Monday, February 9, 2015

DIY Dolly: Valentine's Day Cards

Valentine's Day is just around the corner. Decorations are up, candy is on sale, and of course there is lots of pink and red everywhere. One of the funnest things about Valentine's Day is making cards to give to friends, so today we will be getting crafty.

        Supplies Needed

  • 1 Template (either colored or black & white)
  • Scissors
  • Tape
  • Glue
  • Coloring tools (optional)
  • Sticker (optional)
There are two templates to choose from. One template is black & white, while the other is colored.
I made the black & white template in case you had a black & white printer, or if you wanted to color the envelope or card yourself. The colored one can be used with a colored printer. 

Colored Template

Black & White Template:


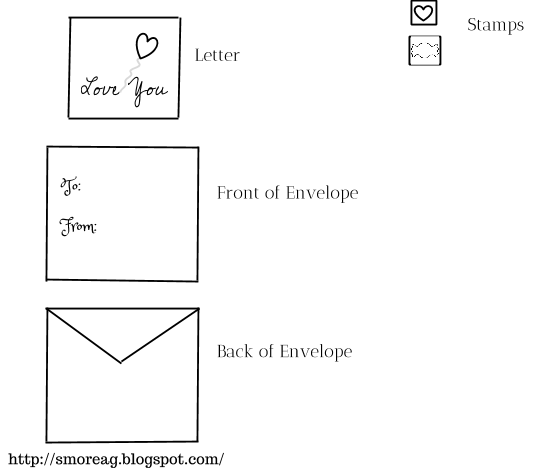
 Step 1: Print out the template you desire on a piece of paper. I used regular copy paper, but you are welcome to print this on card stock. To print the image, right click the template you want and than click on print. If you cannot do this, click on open image in new tab, than right click again and click on print. You can also right click on the image, click on open link, and then click on print. If you have any issues printing, please comment down below and I can try to fix the problem, and figure it out.

Step 2: Cut out all of the parts with scissors (Letter, Front of Envelope, Back of Envelope, and stamps) Note: If you are using the Black & White Template you can color it in now.

Step 3: Cut out the triangle on the Back of the Envelope

Step 4: Tape the sides of the Front & Back Envelope together. (Do not tape the top sides together, just the bottom and left and right sides).

 Step 5: Tape the triangle to the top of the envelope. Tape only the top side of the triangle to the top side of the front of the envelope. This should allow the triangle to move up and down like a flap on a regular envelope.

Step 6: Put the Letter into the envelope (Optional: You can seal the envelope with a sticker if you would like)

Step 7: Glue the stamp of your choice onto the top right corner of the front of your envelope.

Step 8: Write on the Front of the Envelope who the card is to and from.

This craft is awesome because you can use it with other holidays, not just Valentine's Day. You could make Christmas cards, Birthday cards, Get Well Soon cards, etc. The possibilities are endless!